Contents:
When it comes to running paid ads, tracking is everything. But there’s a catch: cookie banners now decide whether you get the data you need or end up flying blind. In this article, we’ll cover why cookie banners exist, how they impact your Google Ads tracking, the tools you can use to set one up, and the best practices for getting more people to hit Accept.
What Are Cookie Banners (and Why Do They Exist)?
Cookie banners aren’t just a nuisance that gets in the way when you visit a website. They’re a legal requirement in many regions, including the UK and EU, designed to give users a choice over how their data is tracked and used.
In practice, this means any business that uses cookies for things like analytics, advertising, or personalisation needs a way to get consent from visitors. That’s where the banner comes in. It lets users accept or reject tracking, ensuring the business complies with privacy laws such as GDPR and the ePrivacy Directive.
Put simply: no banner, no compliance. And without compliance, you run the risk of fines, website warnings, and losing trust with potential customers.
Why Cookie Banners Matter for Ad Tracking
If you’re running Google Ads (or any other paid platform like Microsoft Ads or Meta Ads), cookie consent directly affects your ability to measure results.
When a visitor clicks Accept, your tracking tags can fire as intended. That means you’ll see accurate conversion data, which lets you optimise campaigns, scale spend, and prove ROI.
But if a visitor ignores the banner or clicks Reject, you lose visibility. Conversions still happen, but they don’t get recorded in your ad account. The end result: your ads look less effective than they actually are, and your decisions are based on incomplete data.
This isn’t a minor issue — in some industries, 20–40% of users reject or ignore cookie banners. That’s a huge blind spot if you’re relying on accurate reporting to grow your business.
How to Set Up a Cookie Banner
The good news: you don’t need to build a cookie banner from scratch. There are plenty of tools and plugins that handle the heavy lifting and keep you compliant.
- For WordPress sites: Plugins like CookieYes or Cookiebot are straightforward to install and configure.
- For Shopify: Built-in apps such as GDPR Cookie Compiler or Consentmo can be added directly from the app store.
- For custom-built sites: Services like OneTrust or Cookiebot offer scripts you can embed to handle consent management.
Most of these tools let you:
- Display a banner that meets legal requirements.
- Give users clear options to accept or reject cookies.
- Automatically block tracking scripts until consent is given.
The key is making sure your banner is connected to your tracking setup (Google Tag Manager, GA4, etc.) so that ad tags only fire when consent is granted. Without that link, you risk tracking without permission — which defeats the point.
How to Maximise Cookie Consent Acceptance
Compliance is the baseline — but if most users reject or ignore your banner, your ad tracking suffers. The goal is to stay legal while nudging people towards clicking Accept.
Best practices include:
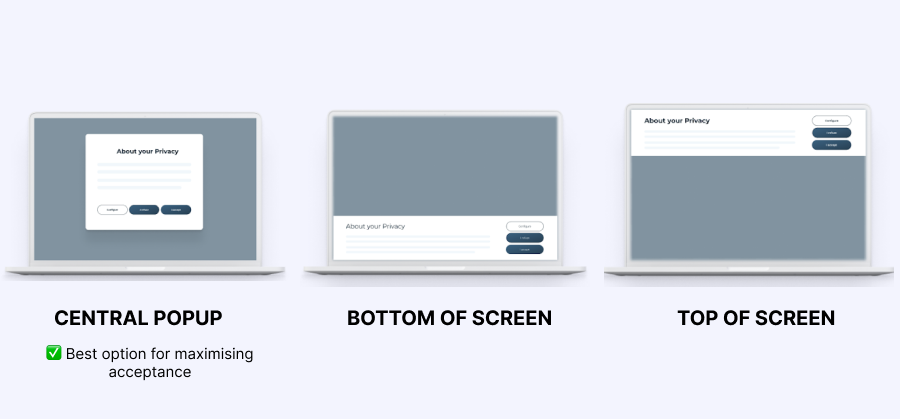
1. Position it as a popup in the centre of the screen
A banner tucked away at the bottom can be easy to ignore. By placing it as a popup in the centre of the screen, you demand attention. Users can’t continue browsing until they’ve made a choice, which drastically increases acceptance rates.
2. Style the buttons wisely
Don’t make Accept and Reject equal in design. Highlight the Accept button with a bold, contrasting colour that stands out. Keep the Reject button in a neutral style. Both options should be visible (for compliance), but it’s completely legal to make the positive choice more appealing.
Note how in the below image, the colouring causes the visitor’s attention to bedrawn towards the ‘accept’ button.
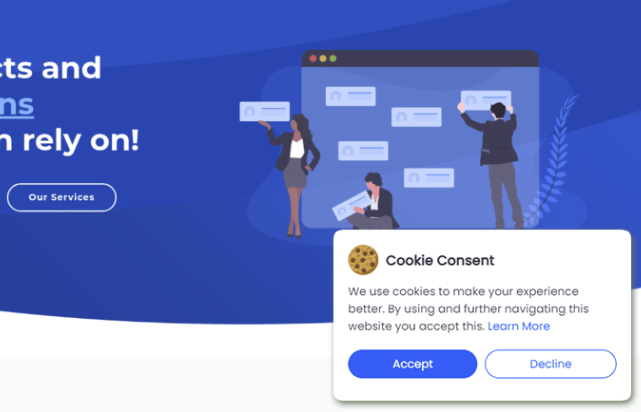
3. Keep the wording simple
Legal jargon kills acceptance rates. People don’t want to read three paragraphs before continuing. Stick to a short, human-friendly message,
e.g.: “We use cookies to improve your experience and measure ads. Do you accept?”
Clear, honest wording builds trust and gets quick clicks.
4. Limit choices
Offering too many granular toggles (ads, analytics, preferences, functional, etc.) overwhelms visitors. Unless you’re operating in a market that requires detailed options, keep it simple: Accept or Manage Settings. The easier the decision, the more likely users are to accept.
5. Make rejecting possible, but less prominent
You must give users a way to say no — but you don’t have to make it the default path. A smaller “Manage settings” link tucked beneath the main message works fine. It ticks the compliance box while steering most users towards the big, bold Accept.
Done right, these tweaks can mean the difference between losing 30–40% of your data and keeping most of it intact.
The Bottom Line
Cookie banners aren’t optional. They’re a legal requirement. But beyond compliance, they have a direct impact on how well you can track and optimise your paid ads. Every time a visitor rejects or ignores your banner, you lose valuable conversion data.
By setting up a proper consent tool, linking it to your tracking, and designing your banner in a way that encourages acceptance, you protect both your business and your ad performance.
In short: get consent right, and you’ll have the accurate data you need to make smarter ad decisions. Get it wrong, and you’re flying blind.
—
If you’re working with us on a paid ads campaign, we can help you to get this set up and optimised for maximum attribution and tracking